Using conda#
conda is a package and environment management system that helps you to find and install software without having to worry about dependency issues.
For more information on conda usage see the conda documentation
However, please note that using conda via a JupyterLab environment will be a little different compared to using it locally.
This page will guide you through how to install software using conda with the following sections:
- conda terminology
- Accessing conda
- conda configurations
- Creating a new conda environment
- Using YAML files to build conda environments
- Using conda environments in Jupyter notebooks
conda terminology#
There are a few different terms which we use throughout this page:
- conda - the package manager
- conda packages - compressed files with everything needed to run software
- channels - repositories for conda to look for packages
- bioconda - channel for bioinformatics software
- conda-forge - channel for bioinformatics software
- conda environment - a collection of conda packages and dependencies
Accessing conda#
conda is already installed and ready to use within JupyterLab environments. To access conda, you need to open a terminal.
Select File -> New -> terminal, or you can launch a terminal session from the Other launcher within the main work area:

You'll get a new terminal tab in the activity bar, and will find yourself in a bash shell.
Remember, there is no sudo access via the terminal in JupyterHub and using conda will be a little different compared to using it locally.
conda can be found using the following command:
conda info --envs
Here you can see that the base conda environment is installed at /opt/conda. However, you cannot install new software to the base conda environment
Since we are running everything inside a JupyterLab environment (a container), any changes made to this part of the filesystem will not be retained once the container is stopped and restarted. This is different to your home dir and team/public share storage which persist.
To avoid any issues, the base environment is configured to be read only. Hence to install new software, you will need to make a new conda environment. You can find examples on how to create conda environments below.
conda configurations#
When you first launch a JupyterLab environment, a default .condarc (Conda Runtime Configuration file) is generated at /opt/conda.
When you create any new conda environments, they will automatically be saved to your team share storage at /shared/team/conda/$JUPYTERHUB_USER.
This configuration is due to your home directory being relatively small (20GB) compared to your team share (500GB+) so it is better to use a larger mount. In addition, it is easy to share conda environments with your team members.
As part of this configuration, by default, whenever you create a new environment, ipykernel will also be installed which will allow you to use the environment with Jupyter notebooks. It will appear on the launcher and be available to select within the python notebooks interface. You can still use the environment as usual within a terminal.
Creating a new conda environment#
Conda installs software from channels with a lot of bioinformatics software found in the bioconda channel. The bioconda channel is also dependent on the conda-forge channel. You already have access to these channels and can see them using the following command:
conda config --show channels
channels:
  - conda-forge
  - bioconda
We will create a new environment and use these channels to install the bacterial genome assembler Shovill for short-read data.
You can search which versions of shovill are available to install:
conda search shovill
Please note this may take a few minutes to run, so be patient.
Loading channels: done
# Name                       Version           Build  Channel
shovill                        0.7.1      pl5.22.0_0  bioconda
shovill                        0.7.1      pl5.22.0_1  bioconda
shovill                        0.7.1      pl5.22.0_2  bioconda
shovill                        0.8.0      pl5.22.0_0  bioconda
shovill                        0.9.0               1  bioconda
shovill                        0.9.0      pl5.22.0_0  bioconda
shovill                        1.0.0               0  bioconda
shovill                        1.0.1               0  bioconda
shovill                        1.0.4               0  bioconda
shovill                        1.0.4               1  bioconda
shovill                        1.0.9               0  bioconda
shovill                        1.1.0               0  bioconda
shovill                        1.1.0      hdfd78af_1  bioconda
shovill                        1.1.0      hdfd78af_2  bioconda
shovill                        1.4.1      hdfd78af_0  bioconda
shovill                        1.4.2      hdfd78af_0  bioconda
Here you can see all the available versions to install. We will use the most up to date version available.
We will create a new environment named shovill-env containing shovill v1.4.2. You will need to confirm the install with y to proceed:
conda create --name shovill-env shovill=1.4.2
Tip
If you see the error CondaValueError: prefix already exists, then there is already a conda environment using the same name, so you will need to pick a different name !
When conda has finished setting up the environment, you can run the following command to activate the environment:
conda activate shovill-env
(shovill-env) jovyan:~$
shovill --version
shovill 1.4.2
To list which packages and dependencies are installed in your shovill-env environment you can run the following command:
conda list
To install a new software package within your currently activated environment you can run the following command:
conda install $packageName
To deactivate your current conda environment you can run the following command:
conda deactivate
To see a list of all environments you can run the following command:
conda info --envs
It will look as follows with the location as /shared/team/conda/$JUPYTERHUB_USER:
# conda environments:
#
# * -> active
# + -> frozen
base                     /opt/conda
shovill-env             /shared/team/conda/michaelamatthews.tutorials/shovill-env
This will update as you and your team create more conda environments.
To delete an environment you can use the following command, you will need to confirm the deletion with y to proceed:
conda env remove -n shovill-env
Using YAML files to build conda environments#
You can also create conda environments using YAML files e.g environment.yml. This is great if you want to recreate an conda environment with the exact same software and dependency versions elsewhere.
You can export an existing active conda environment into a YAML file:
conda activate shovill-env

conda env export > environment.yml
This file will contain the name of the environment, the channel and dependencies required to install like so:
name: shovill-env
channels:
  - conda-forge
  - bioconda
dependencies:
  - _openmp_mutex=4.5=20_gnu
  - alsa-lib=1.2.16.1=hb03c661_0
  - asttokens=3.0.1=pyhd8ed1ab_0
  - bwa=0.7.19=h577a1d6_1
  - bzip2=1.0.8=hda65f42_9
  - c-ares=1.34.6=hb03c661_0
  - ca-certificates=2026.6.17=hbd8a1cb_0
  - cairo=1.18.4=he90730b_1
  - comm=0.2.3=pyhe01879c_0
  - csvtk=0.37.0=ha770c72_1
  - debugpy=1.8.21=py310h25320af_0
  - decorator=5.3.1=pyhd8ed1ab_0
  - exceptiongroup=1.3.1=pyhd8ed1ab_0
  - executing=2.2.1=pyhd8ed1ab_0
  - flash=1.2.11=hadc24fc_2
  - font-ttf-dejavu-sans-mono=2.37=hab24e00_0
  - font-ttf-inconsolata=3.000=h77eed37_0
  - font-ttf-source-code-pro=2.038=h77eed37_0
  - font-ttf-ubuntu=0.83=h77eed37_3
  - fontconfig=2.18.1=h27c8c51_0
  - fonts-conda-ecosystem=1=0
  - fonts-conda-forge=1=hc364b38_1
  - giflib=5.2.2=hd590300_0
  - graphite2=1.3.15=hecca717_0
  - harfbuzz=14.2.1=h6083320_0
  - htslib=1.23.1=h633afcb_0
  - icu=78.3=h33c6efd_0
  - ipykernel=7.3.0=pyha191276_0
  - ipython=8.37.0=pyh8f84b5b_0
  - jedi=0.19.2=pyhd8ed1ab_1
  - jupyter_client=8.9.1=pyhcf101f3_0
  - jupyter_core=5.9.1=pyhc90fa1f_0
  - kernel-headers_linux-64=3.10.0=he073ed8_18
  - keyutils=1.6.3=hb9d3cd8_0
  - kmc=3.2.4=h5ca1c30_4
  - krb5=1.22.2=ha1258a1_0
  - lcms2=2.19.1=h0c24ade_1
  - ld_impl_linux-64=2.45.1=default_hbd61a6d_102
  - lerc=4.1.0=hdb68285_0
  - libcups=2.3.3=h7a8fb5f_6
  - libcurl=8.20.0=hcf29cc6_0
  - libdeflate=1.25=h17f619e_0
  - libedit=3.1.20250104=pl5321h7949ede_0
  - libev=4.33=hd590300_2
  - libexpat=2.8.1=hecca717_1
  - libffi=3.5.2=h3435931_0
  - libfreetype=2.14.3=ha770c72_0
  - libfreetype6=2.14.3=h73754d4_0
  - libgcc=15.2.0=he0feb66_19
  - libgcc-ng=15.2.0=h69a702a_19
  - libglib=2.88.1=h0d30a3d_2
  - libgomp=15.2.0=he0feb66_19
  - libiconv=1.18=h3b78370_2
  - libjpeg-turbo=3.1.4.1=hb03c661_0
  - liblzma=5.8.3=hb03c661_0
  - libnghttp2=1.68.1=h877daf1_0
  - libnsl=2.0.1=hb9d3cd8_1
  - libpng=1.6.58=h421ea60_0
  - libsodium=1.0.22=h280c20c_1
  - libsqlite=3.53.2=h0c1763c_0
  - libssh2=1.11.1=hcf80075_0
  - libstdcxx=15.2.0=h934c35e_19
  - libstdcxx-ng=15.2.0=hdf11a46_19
  - libtiff=4.7.1=h9d88235_1
  - libuuid=2.42.2=h5347b49_0
  - libwebp-base=1.6.0=hd42ef1d_0
  - libxcb=1.17.0=h8a09558_0
  - libxcrypt=4.4.36=hd590300_1
  - libzlib=1.3.2=h25fd6f3_2
  - lighter=1.1.3=h077b44d_2
  - llvm-openmp=8.0.1=hc9558a2_0
  - matplotlib-inline=0.2.2=pyhd8ed1ab_0
  - megahit=1.2.9=haf24da9_8
  - ncurses=6.6=hdb14827_0
  - nest-asyncio2=1.7.2=pyhcf101f3_0
  - openjdk=25.0.2=ha668962_0
  - openmp=8.0.1=0
  - openssl=3.6.3=h35e630c_0
  - packaging=26.2=pyhc364b38_0
  - parso=0.8.7=pyhcf101f3_0
  - pcre2=10.47=haa7fec5_0
  - perl=5.32.1=7_hd590300_perl5
  - perl-file-spec=3.48_01=pl5321hdfd78af_2
  - perl-findbin=1.54=pl5321hdfd78af_0
  - pexpect=4.9.0=pyhd8ed1ab_1
  - pickleshare=0.7.5=pyhd8ed1ab_1004
  - pigz=2.8=h421ea60_2
  - pilon=1.24=hdfd78af_0
  - pip=26.1.2=pyh8b19718_0
  - pixman=0.46.4=h54a6638_1
  - platformdirs=4.10.0=pyhcf101f3_0
  - prompt-toolkit=3.0.52=pyha770c72_0
  - psutil=7.2.2=py310h139afa4_0
  - pthread-stubs=0.4=hb9d3cd8_1002
  - ptyprocess=0.7.0=pyhd8ed1ab_1
  - pure_eval=0.2.3=pyhd8ed1ab_1
  - pygments=2.20.0=pyhd8ed1ab_0
  - python=3.10.20=h267e890_1_cpython
  - python-dateutil=2.9.0.post0=pyhe01879c_2
  - python_abi=3.10=8_cp310
  - pyzmq=27.1.0=py310ha71cbf4_3
  - readline=8.3=h853b02a_0
  - samclip=0.4.0=hdfd78af_1
  - samtools=1.23.1=ha83d96e_0
  - seqkit=2.13.0=he881be0_0
  - setuptools=82.0.1=pyh332efcf_0
  - shovill=1.4.2=hdfd78af_0
  - six=1.17.0=pyhe01879c_1
  - skesa=2.5.1=h077b44d_2
  - spades=3.15.5=h5fb382e_3
  - stack_data=0.6.3=pyhd8ed1ab_1
  - sysroot_linux-64=2.17=h0157908_18
  - tk=8.6.13=noxft_h366c992_103
  - tornado=6.5.7=py310h7c4b9e2_0
  - traitlets=5.15.1=pyhcf101f3_0
  - trimmomatic=0.40=hdfd78af_0
  - typing_extensions=4.15.0=pyhcf101f3_0
  - tzdata=2025c=hc9c84f9_1
  - velvet=1.2.10=h577a1d6_9
  - wcwidth=0.8.1=pyhd8ed1ab_0
  - wheel=0.47.0=pyhd8ed1ab_0
  - xorg-libice=1.1.2=hb9d3cd8_0
  - xorg-libsm=1.2.6=he73a12e_0
  - xorg-libx11=1.8.13=he1eb515_0
  - xorg-libxau=1.0.12=hb03c661_1
  - xorg-libxdmcp=1.1.5=hb03c661_1
  - xorg-libxext=1.3.7=hb03c661_0
  - xorg-libxfixes=6.0.2=hb03c661_0
  - xorg-libxi=1.8.3=hb03c661_0
  - xorg-libxrandr=1.5.5=hb03c661_0
  - xorg-libxrender=0.9.12=hb9d3cd8_0
  - xorg-libxt=1.3.1=hb9d3cd8_0
  - xorg-libxtst=1.2.5=hb9d3cd8_3
  - zeromq=4.3.5=h09e67af_11
  - zlib=1.3.2=h25fd6f3_2
  - zstd=1.5.7=hb78ec9c_6
prefix: /shared/team/conda/michaelamatthews.tutorials/shovill-env
The active environment can then be deactivated again:
conda deactivate
Tip
Remember to change the environment name if an environment with the same name already exists where you wish to install the new environment.
To create a conda environment from this YAML file you can use the following command:
conda env create -f environment.yml
Using conda environments in Jupyter notebooks#
As described within the conda configuration section, all environments have ipykernel installed by default. This will allow you to use the environment with Jupyter notebooks or on the Console.
Your environments will appear on the launcher:
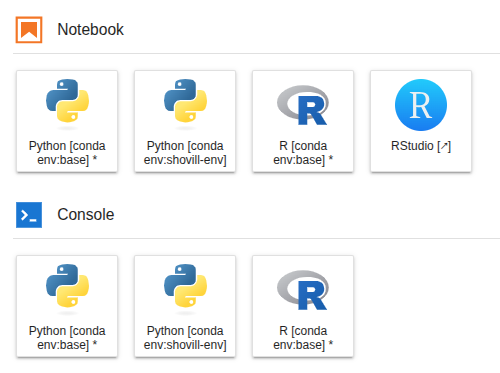
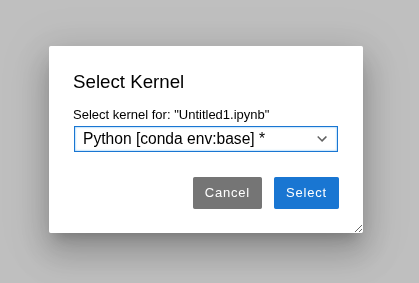
And also be available to select within the python notebooks interface. Just select the kernel on the top right of the notebook:

Usually this will be "Python [conda env:root]" or "Python 3 (ipykernel)".
Use the drop down menu to choose the environment e.g "Python [conda env:shovill-env]":
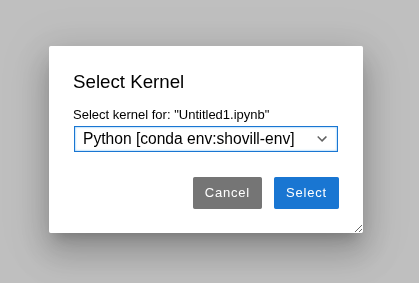
This will update the kernel on the top right of the notebook:

After changing the kernel, it's worth restarting the kernel and running your code cells again for the environment to be fully registered.
See our Jupyter notebook page for more information on using JupyterLab notebooks.
What is next ?#
Once you know some conda basics, you can also try using the jupyter notebooks or check for more information on what storage is available.