Using QIIME 2 on Jupyter Notbook Servers#
What is QIIME 2?#
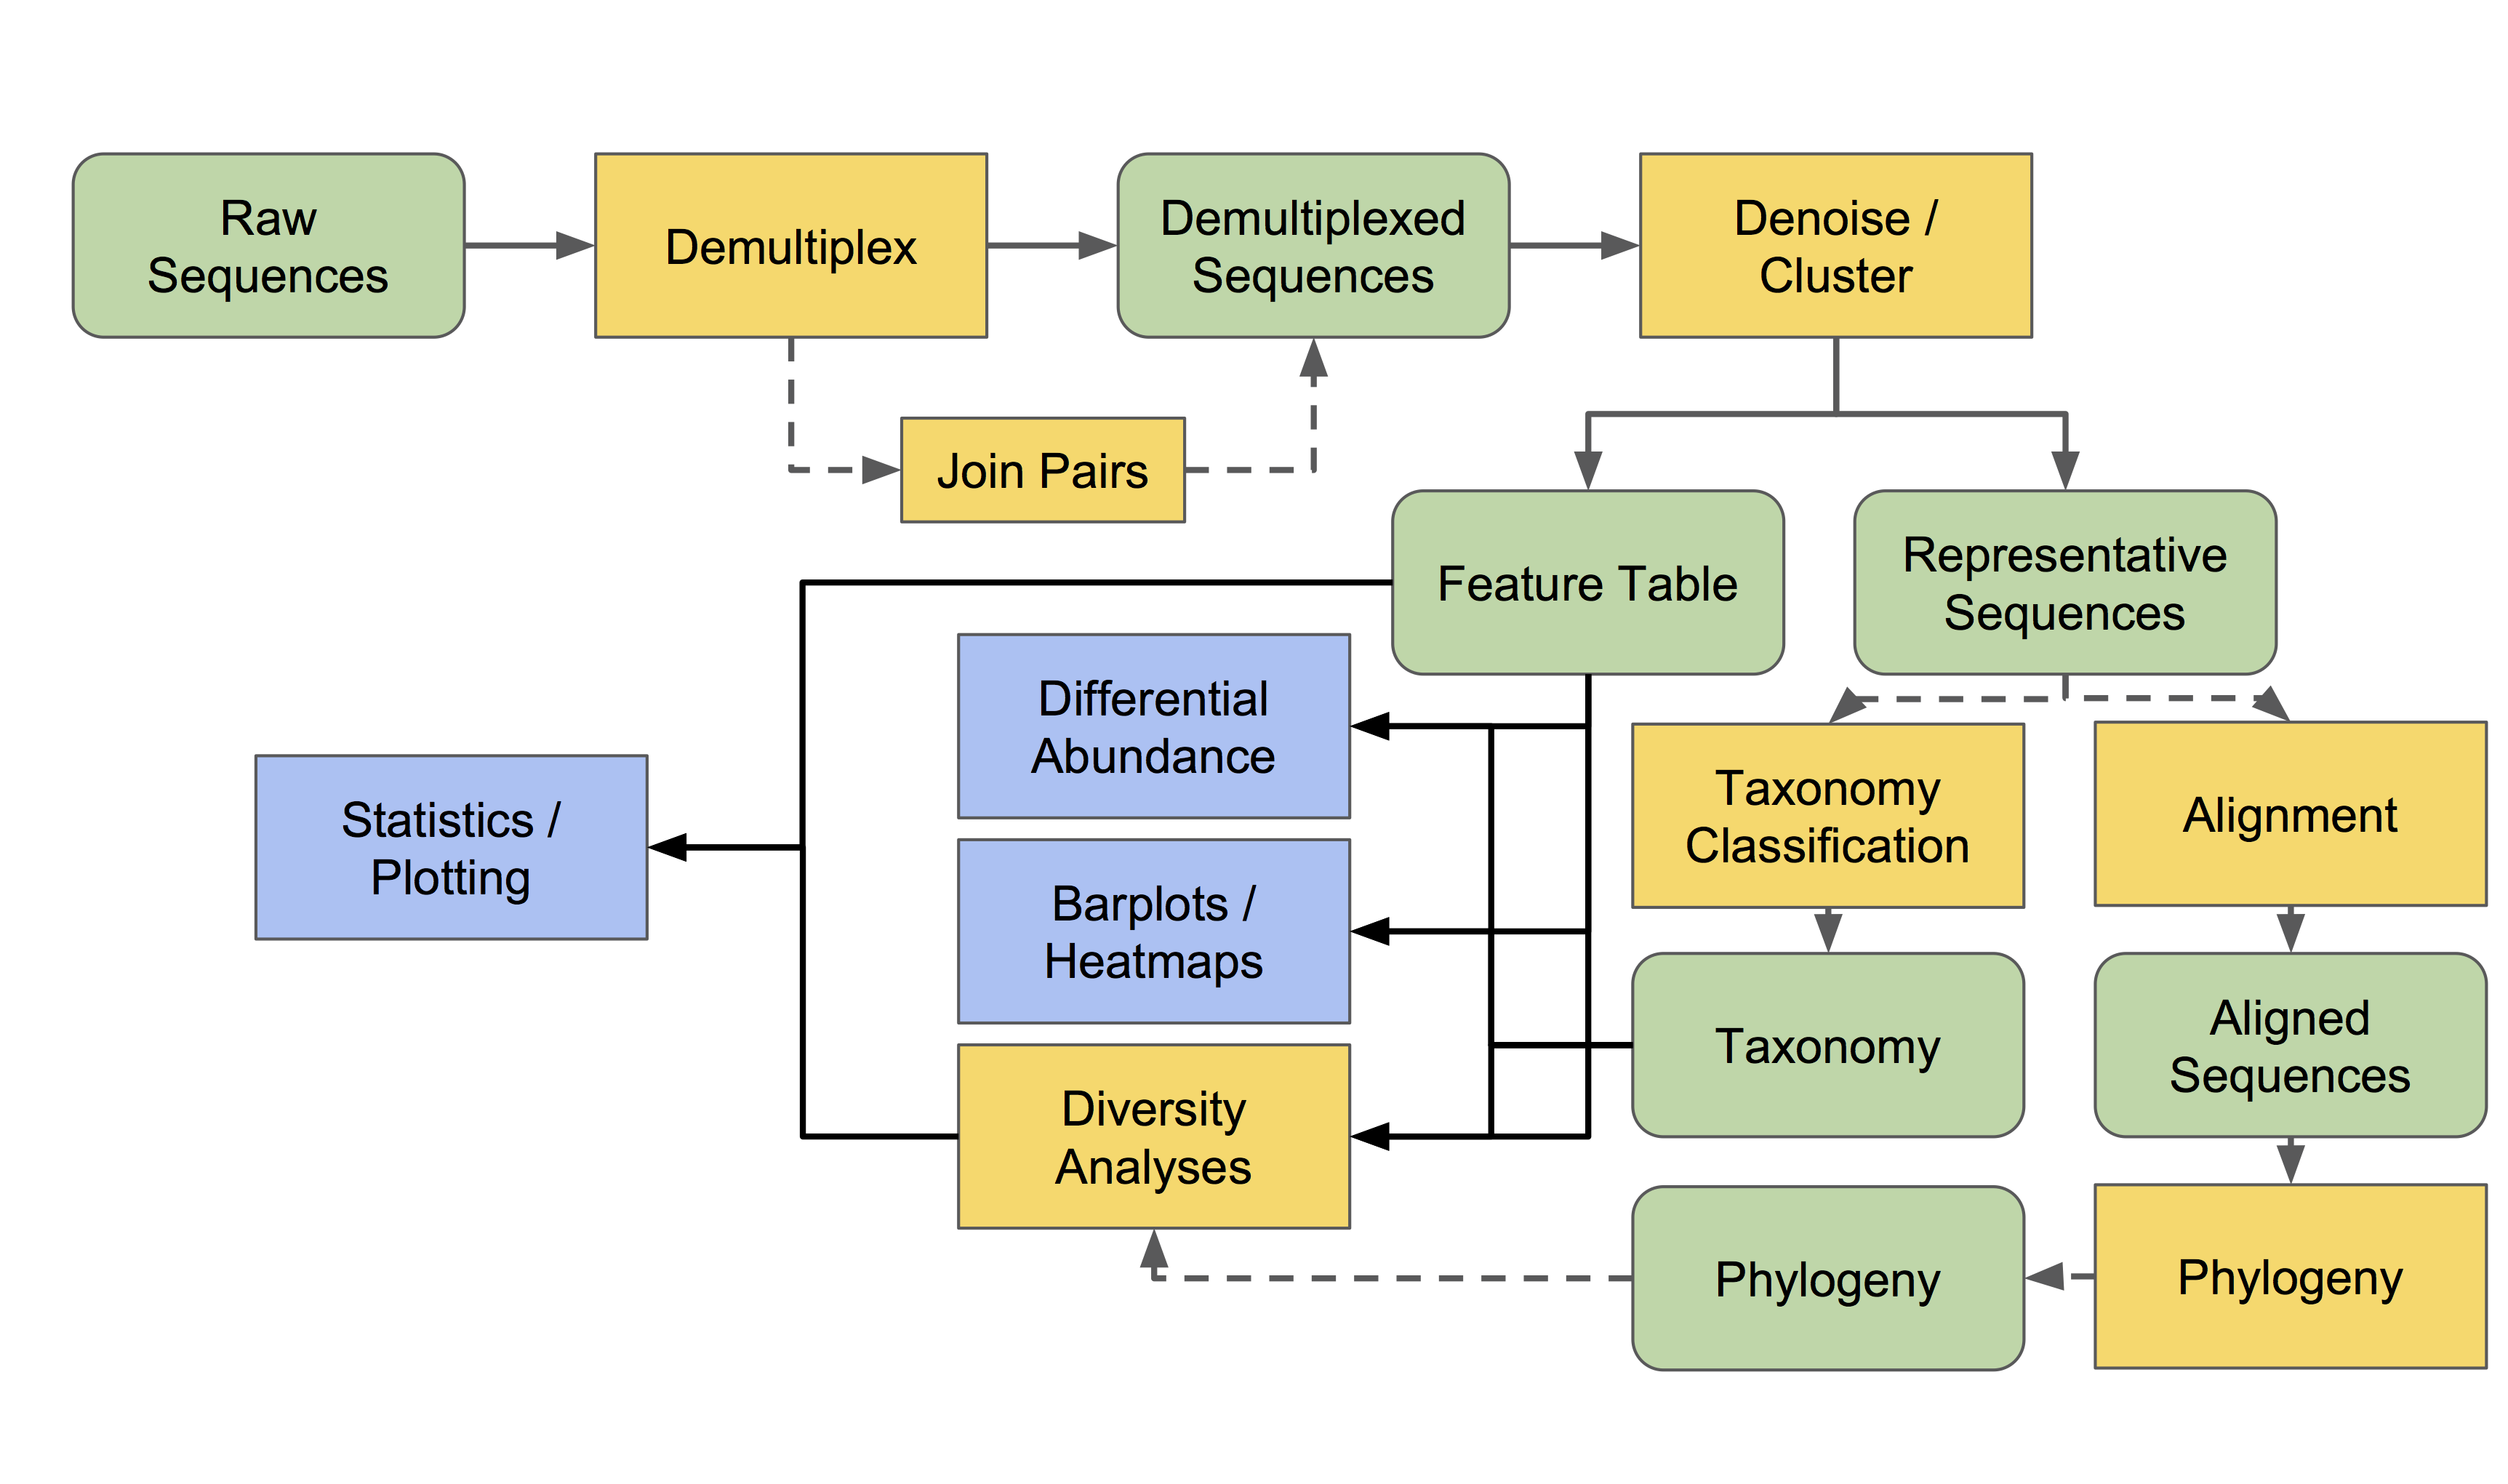
QIIME 2 (Boylan et al., 2019) is a microbiome analysis package with an emphasis on data transparency. In short it allows for end-to-end analysis, including demupltiplexing, noise correction, taxonomic classification, phylogeny inference and plotting. Below is a flow chart of the conceptual outline of QIIME 2 (courtesy of the authors, found here).

Installation#
Conda#
To install via Conda first you must download the environment YAML file supplied by the QIIME 2 authors.
wget https://data.qiime2.org/distro/core/qiime2-2023.7-py38-linux-conda.yml
This will download a YAML file called qiime2-2023.7-py38-linux-conda.yml. You can create an environment from this YAML:
conda env create -n qiime --file qiime2-2023.7-py38-linux-conda.yml
In some instances the creation of the QIIME 2 Conda environment will not solve. This may be caused by the Conda configuration being set to to having a strict priority. Briefly, Conda channels are locations where the packages are stored. When you install a Conda package you are downloading and installing them from remote URLs. These channels are the warehouse where packages are managed. Different channels can host the same package. This can be to the users' benefit as they can access different management structures for a given package, but it can also be to their detriment as there can be collisions in how these packages are managed.
In short, strict channel priority can lead to lower priority channels to not be considered if a package is in a higher priority channel. For more information, see here. As QIIME 2 has a large number of dependencies, this can lead to difficulty installing it.
To see if strict priority is enabled run conda config --show | grep channel_priority. If it is enabled then channel_priority: strict will be returned. To rectify this run:
conda config --set channel_priority flexible
Docker#
You do not have to actively build a Docker container of QIIME 2 to run it. The Authors maintain a Docker container hosted at quay.io. This can be useful as Nextflow pipelines can leverage Kubernetes pods on the fly, giving you access to more compute.
Running QIIME 2#
QIIME 2 can be ran both from the command line interface (CLI) and directly through Python by importing it as a module. There are some advantages to both. The CLI allows one to work freely through the command line, gives one access to many commands and can have tab-completion enabled. The Python API allows for finer grained controls and can be quicker as intermediate files do not need to be read to and from disk.
Command Line Interface#
First we need to activate the environment we have built:
conda activate qiime
Now we have access to QIIME 2. Download some sample single end data and place it in a directory called se-reads:
mkdir se-reads ; wget \
  -O "se-reads/barcodes.fastq.gz" \
  "https://data.qiime2.org/2023.7/tutorials/moving-pictures/emp-single-end-sequences/barcodes.fastq.gz"
then download its corresponding metadata:
wget \
  -O "sample-metadata.tsv" \
  "https://data.qiime2.org/2023.7/tutorials/moving-pictures/sample_metadata.tsv"
The reads can then be imported into QIIME 2. Here, QIIME 2 will convert the fastq file into an artifact which can be interacted with downstream:
qiime tools import \
  --type EMPSingleEndSequences \
  --input-path se-reads \
  --output-path se-read.qza
and then be demultiplexed:
qiime demux emp-single \
  --i-seqs se-reads \
  --m-barcodes-file sample-metadata.tsv \
  --m-barcodes-column barcode-sequence \
  --o-per-sample-sequences demux.qza \
  --o-error-correction-details demux-details.qza
The QIIME 2 ecosystem is substantial. For a reference of the different functionalities, see here.
Nextflow#
The same CLI tools can be incorporated into Nextflow pipelines. There is a pre-existing Nextflow config file that allows any Nextflow process running in a Docker container to be launched using the Kubernetes executor. Please see the "Using Nextflow" tutorial for a full walkthrough. A number of functions in QIIME 2 can be parallelized, which serve as great candidates for being launched in Nextflow as they can take full advantage of the Kubernetes pods. Below is an example process to compute a multiple sequence alignment using MAFFT:
process mafft {
    cpus 8
    memory "16GB"
    container="quay.io/qiime2/core"

    input:
    path(sequence_qza)

    output:
    path(alignment.qza), emit: alignment_qza

    script:
    """
    qiime alignment mafft --i-sequences $sequence_qza --p-n-threads "${task.cpus}" --o-alignment alignment
    """
}
Note that the container variable is defined using the QIIME 2 authors' Docker container. This allows for a Kubernetes pod to be span up.
Jupyter Notebook (Python API)#
QIIME 2 can be imported as a Python module. It is interoperable with a number of other Python libraries such as Pandas and Biom.
from qiime2 import Artifact
from qiime2.plugins import feature_table

import pandas as pd

#read in a table of features
unrarefied_table = Artifact.load('table.qza')
rarefy_result = feature_table.methods.rarefy(table=unrarefied_table, sampling_depth=100)
rarefied_table = rarefy_result.rarefied_table

#convert to Pandas DF
df = rarefied_table.view(pd.DataFrame)
df.head()